EasyCop Ultimate is perhaps the most advanced bot in the market. Its clean interface, many features, and successful internal add to cart procedure give it the potential to be the best choice for all Nike and other store add to cart needs. That being said, it is important that you know how to use each feature correctly so that you can utilize EasyCop Ultimate to its fullest.
Installation
Upon purchasing EasyCop Ultimate, you will be given a download link and will be able to create an account with us. This account will be used to log into EasyCop Ultimate itself. The download comes as an installer, you can choose what directory you want to install in. A shortcut will be created in your program menu and desktop. You can also log into this website to change your password, upgrade, or download the installer again. All updates are done automatically within the program, so there will be no need to keep downloading new versions from our site.
You may need to download Microsoft’s .NET 4.5 Framework, get it here: Microsoft .NET 4.5.
Using EasyCop Ultimate
Upon opening EasyCop Ultimate and signing in, you will see this screen:
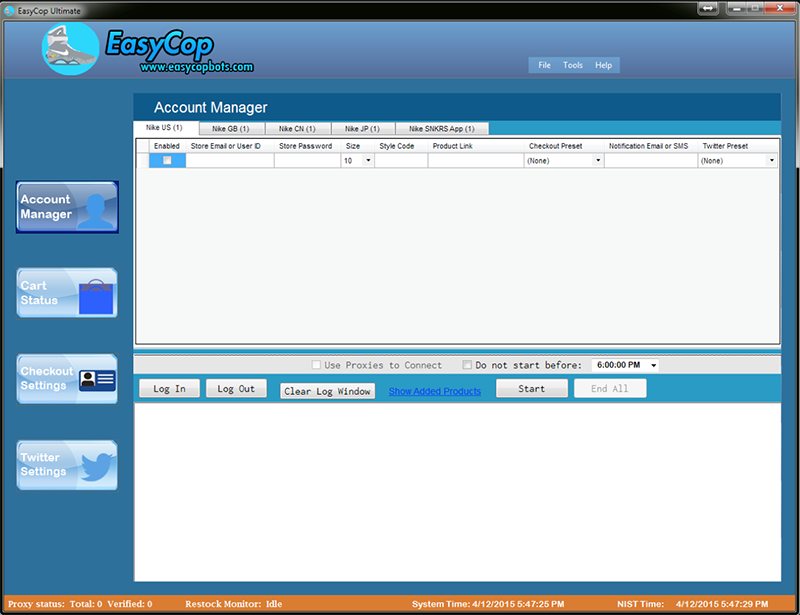
You can start your EasyCop Ultimate experience by opening the settings, located under Tools.
Bot Settings
 Add to Cart
Sometimes when you choose a size to add to cart, it is no longer in stock and therefore cannot be added. EasyCop Ultimate is prepared, according to your choice it will either attempt to add a larger size (until it finds one available) or a smaller size. This option can be skipped if you’d like, and it’ll keep retrying for the same size. EasyCop Ultimate also lets you change how early during a release add to cart requests are sent, with a maximum of 30 seconds. This option is the “Add to Cart Early” option, and should only be used by those who have much bot experience.
Retries
As with all websites, Nike does not always accept a request, so it is necessary to send the request multiple times. In settings, you can control how many times EasyCop Ultimate will try to login to an account, how many times it’ll try to send an add to cart request, and how many times it will try to checkout.
Delays
Delays are necessary so that you do not overload a web server with requests, and avoid errors like Access Denied or Service Unavailable. The Check Product delay controls how often EasyCop Ultimate will reload the product page provided when it is unavailable. The Site Down delay controls how much time will be sent before making another request if Nike crashes. The Add to Cart delay is how often EasyCop Ultimate will send another add to cart request if the previous one fails, and the Twitter Re-read delay is how often the Twitter stream is refreshed when searching for a tweet. EasyCop Ultimate also allows you to put in a Login and Cart Status delay. This is the amount of time that is waited before sending either another login request or a cart status request. Generally you don’t need these unless you’re running more than 15 accounts.
Accounts Tab
 Columns
EasyCop Ultimate’s accounts are sorted into columns. Each one is rather simple:
Enabled – This decides or not the selected account will be running.
Store Email or User ID – This is where the account’s username goes.
Store Password – This is where the account’s password goes.
Size – This is the size that the account will attempt to get. There is no need to specify if it is GS or not, EasyCop Ultimate can interpret the product page given and decide what to do accordingly.
Style Code – If a Product Link is unknown and Twitter is not configured, the Style Code will be used to locate the item you wish to add.
Product Link – This is where you can put any early links into. EasyCop Ultimate assigns priority to this as a method of finding a product over both Twitter and Style Code.
Checkout Preset – Once you have made a Checkout Preset in the Checkout Settings tab, you can select it here to be used. If you have multiple presets, you can choose Smart Checkout, which will be explained later in this documentary.
Notification Email or SMS – After notifications are configured or are left to default, you can put in your email here and you will be notified once the product is added to cart. Alternatively, you can use your phone number by adding the appropriate email suffix to your number. For example, AT&T’s is @txt.att.net, so the email would be 123@txt.att.net. Refer to this chart.
Twitter Preset – If a Product Link is unknown, you can select one of your Twitter Presets and EasyCop Ultimate will monitor the designated user until it finds the item.
Grid Controls

By right clicking in any of the grids, you can bring up a the menu shown above. Here is the rundown of each option:
Insert Row – This option will insert a blank row above the current.
Delete Row – This option will delete the current row completely from the grid.
Delete Empty Rows – This option will delete all empty rows in the grid.
Clear All – This option will delete every account in the current grid.
Full Size Run – This option will neatly assign every account a size in a manner such that the sizes range from 8-13.
Randomize Sizes – This option will assign each account a random size (size 8-13 in US/GB).
Copy Cell Down – This option will copy the clicked in cell’s value to each of the accounts below it.
 You can shift click the rectangles all the way on the lift to select multiple accounts. This way, you can delete multiple accounts at once or insert a certain number of rows.
Main Buttons
![]()
Each of these buttons are important when using EasyCop Ultimate and you should be familiar with them.
The Use Proxies to Connect checkbox will assign a proxy to each account when the account logs in, based on the proxies you have in the Proxy List. The “Do not start before” option allows you to choose a time or date to start running, accessible via the dropdown arrow. After enabling this option, press “Start” and EasyCop Ultimate will countdown until your time.
The Log In button will log into all enabled accounts, or if some accounts are already logged in it will log into the ones that are not. The Log Out button logs out of all enabled accounts. The Clear Log Window button will clear the current log. Show Added Products will bring up the Added Products window. The Start Button will start the process, logging into any accounts that aren’t already logged in. End All becomes available when EasyCop Ultimate is running and will cancel all tasks.
Added Products

Whenever an item is added to cart, it gets put into the “Added Products” grid. Here, you can see which accounts carted products and their sizes, as well as what time the account carted. Pressing Clear will clear all of the records in the grid.
Cart Status Tab
The Cart Status Tab is ideal for managing and viewing many accounts at once, and serves as an extremely helpful tool when used correctly.

Checkout Accounts

You are able to spawn checkout browsers by clicking different accounts on the grid (shift click for multiple) and pressing “Checkout Selected Accounts”. You can then manually view your cart or checkout the items in your cart.
Remove Items
EasyCop Ultimate makes removing many items at a time easy. Simply click on the item (shift click for multiple) and hit “Remove Selected Items”. A window will then appear, showing the progress of the removal.
Checkout Settings

EasyCop Ultimate allows you to automatically pay for items in the US with as many presets as you would like.
Managing Presets
To begin using EasyCop Ultimate for auto checkout, fill out the required information in the form and save the preset. All your presets will appear on the left, and can be accessed by double clicking. You can then edit the info and save, or delete your preset if you would like. You can use a credit card or PayPal to pay.
Smart Checkout
Smart Checkout is one of EasyCop Ultimate’s most useful features. When you enable Smart Checkout for a preset, it adds it to a separate list of presets. When accounts are ran and have Smart Checkout enabled, there aren assigned a random Smart Checkout preset as soon as they successfully add a product to cart. This way, you can place all your orders with different payment profiles instead of having to assign specific presets to accounts.
Preset Groups
EasyCop Ultimate allows you to conveniently sort your presets into groups so that they can checkout intelligently.
Managing Preset Groups
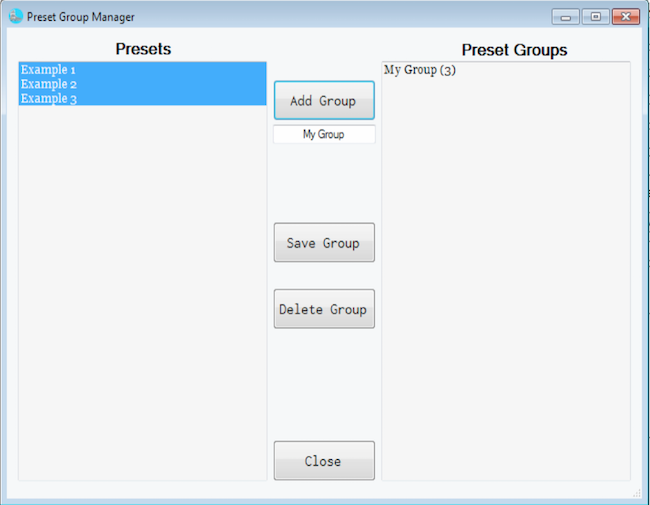
With version 1.33, EasyCop Ultimate comes with a “Mange Preset Groups” button in the Checkout Settings tab. Press it and this new window will appear, populated with your presets and current groups. To create a new group, highlight the presets on the left that you would like to add, name the group in text field, and hit “Add Group”. To edit the contents of this group, select the group in the group list on the right, select new presets, and hit “Save Group”. You can make as many groups as you want.
Assigning Groups to Accounts
When all your groups are made, you will see them on the Payment Preset drop down menu in the accounts grid. The groups are signified with a number (number of presets in group) in parenthesis before the group name. Select this group for as many accounts as you’d like. With Preset Groups, each preset will only be used once – the first accounts to cart will be the first to get assigned available presets. As soon as the preset is assigned, it becomes unavailable to every single other group and to smart checkout. This is to avoid using the same payment method multiple times on the same store and therefore not getting orders cancelled. If you would like to use the same method multiple times within a group, just clone your preset and add it to the group. EasyCop Ultimate will let you know if there are no more presets left.
Tools
EasyCop Ultimate comes with tools that make your add to cart experience not only more convenient, but successful as well.
Proxy List
Whenever you are running more than 5 accounts during a release, the use of proxies are generally needed. Proxies serve to hide your IP address to that Nike will not be able to tell that you are submitting many cart requests, in this way you can easily send hundreds of cart requests without receiving the dreaded Access Denied error from Nike.
Managing Proxies
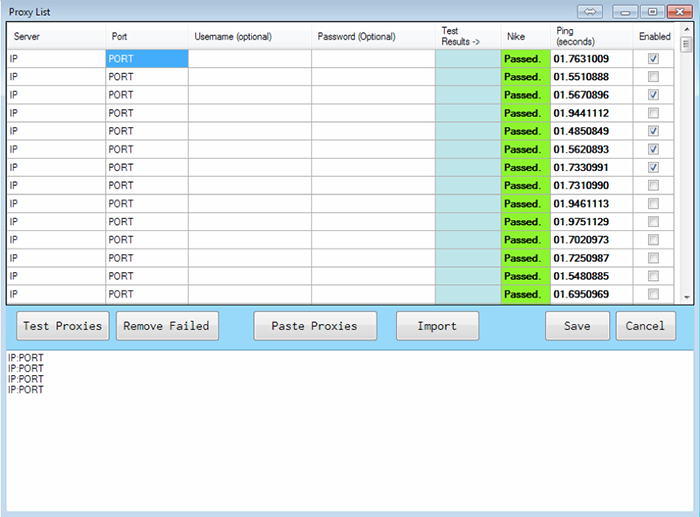
EasyCop Ultimate allows you to use as many proxies as you would like. To begin using proxies, you can either manually put them into the grid or use the “Paste Proxies” section. Upon clicking it, a textbox will appear below it. There, you can paste in your proxies in either IP:PORT or IP:PORT:USERNAME:PASSWORD format. Once the proxies are pasted in, you can hit the “Import” button and it will add all of your proxies appropriately to the grid. On the far right column, you can enable or disable each of the proxies. By default, all proxies will be enabled.
Test Proxies
Once you have imported all of your proxies, you can then test each of them out to ensure that they are compatible with the Nike servers. To do this, simply press the “Test Proxies” button. Each proxy will then display if it is blocked by Nike or not, as well as the time it took for Nike to respond to the request. Once you have tested all the proxies, you can remove all that have failed by clicking the “Remove Failed” button.
Nike Account Generator

We know that the process of making many Nike accounts is exhausting, and so we have developed a generator that will create all the accounts for you.
Required Information
Simply put in your basic credentials and password (compliant with Nike’s password rules) and the number of accounts you would like. You can also choose to create the accounts using proxies, and to populate the current accounts grid with the created accounts. Once you have all of that filled out, you can press “Generate Nike Accounts” and all of your accounts will be created. Be warned that generating too many accounts can give you Access Denied and can temporarily prevent you from creating more accounts or accessing the Nike site.
Nike Restock Monitor

Nike often will replenish the stock of their products without warning, and so EasyCop Ultimate allows you to be ready for this and know about a restock before others do.
Monitoring Items
To start monitoring items, simply put in the product url of the shoe. In the next column, put in the name of the shoe (doesn’t have to be exact, can just be a nickname) and in the final column put in a notification email. Press “Start Monitoring” and EasyCop Ultimate will send you a notification as soon as the item is in stock.
Importing and Exporting
Even though EasyCop Ultimate autosaves all accounts and proxies, it is sometimes necessary to export them so that they can be saved for later use or edited in a text processor like Microsoft Excel.
Accounts
If you run an add to cart service, you often need to import or export large sheets of data. EasyCop Ultimate makes it easy for you to put all necessary orders into the appropriate grids.
Importing .ecb
One of the file type choices you have for importing accounts into EasyCop Ultimate is .ecb. This file type is our own encrypted type that can only be read by the bot. Though when opened it might appear as gibberish, it does a good job of hiding personal information. EasyCop Ultimate is the only program that will generate these .ecb files, and when imported it will successfully read all of the data and appropriately populate grids.
Importing .csv

 Often add to cart services store all of their data in comma separated value files (.csv). These files are easily manipulated in programs like Microsoft Excel and can then be imported into the bot. All .csv files being imported to the bot must comply with this format. Once you have a properly structured .csv file you can import it into EasyCop Ultimate and all accounts will be read and populated appropriately.
Exporting .ecb & .csv
When you have accounts in the bot and you would like to either transfer those accounts to a different computer or save the accounts as a record, you can use the Export feature to do so. By pressing Export Accounts, you will be presented with two file type options: .ecb and .csv. Once again, .ecb is our encrypted file type and once exported it can only be read by EasyCop Ultimate. If you do not wish to use this format, you can export as .csv which can then be manipulated in a text processing application.
Proxies
You might want to import or export your proxies if you plan on using EasyCop Ultimate on a different machine This is easily accomplishable.
Importing .csv
If you want to populate EasyCop Ultimate’s proxies easily, you can press Import Proxies in the File menu. You can then locate the .csv proxy file you wish to import.
Exporting .csv
If you wish to generate a file with the proxies in EasyCop Ultimate, you can click Export Proxies in the File menu. This file will contain information about each proxy and allow you to manipulate the data as you see fit so that it can be imported back into EasyCop Ultimate. Besides writing in the comma separated format, you can also populate the file with IP:PORT or IP:PORT:USERNAME:PASSWORD format, with a line break between each proxy. Once this is done, you can save the file (make sure you’re saving as a .csv) and import it back into EasyCop Ultimate.
Release Procedure
If you are unfamiliar with how to properly use the bot on a release, we have some advice that you could use to improve your EasyCop Ultimate experience.
Our Advice
Sometimes your internet speed or computer processor is not optimal for Nike releases. Do not worry, there are resources out there that you can use to compensate for this. One resource you may consider using is a server, which acts as a desktop that you can access remotely that often has an industrial-strength processor that is better than your own. Start by googling “dedicated server” and pick one that fits your needs and budget. You can then upload EasyCop Ultimate onto that server to use for a release by logging into our website and clicking the download link.
A question that we are asked a lot is “What can I do to be the most successful on a release?”. The answer to this question differs depending on the type of release that is happening.
To start off, we recommend using EasyCop Ultimate on a server or computer that is up-to-date and has a powerful processor.
Secondly, we advise you to use early links as they are the most reliable method of locating a product. If the release is a countdown release, consider using the “Do not start before” feature to schedule the bot to run 10 minutes before the release so that it will detect countdown. If the release is not a countdown release, make sure that your delays are configured such that you can detect a product early. To do this, lower your “Check Product Delay” in settings to around a second or so, depending on what your computer and/or internet speed can support.
We always advise the use of proxies so that your anonymity can be protected and so that you will minimize the risk of getting the Access Denied error from Nike.
We also advise that you take advantage of our Auto Checkout feature if you plan on buying pairs for yourself, as sometimes if you are not quick enough the shoe that you added to your cart will be removed.
Once you have done all this, you should be set up for a successful release. Please remember that some factors are random and cannot be controlled by us, such as the time it takes for Nike to respond to your add to cart request.
Final Notes
Please note that nothing is perfect in the Nike release procedure, but that EasyCop Ultimate will give you the best possible chance at buying multiple pairs of limited shoes. If you have any remaining questions after viewing this documentation, the FAQ section, and our YouTube channel please do not hesitate to contact us and we will be happy to help.